14 Common Roasting Mistakes And How to Avoid Them


 288 Comments


Roasting is easily one of the most rewarding cooking techniques in the kitchen. There is a special kind of magic in sliding a tray of seasoned vegetables or a marinated chicken into a hot oven and pulling out a golden, caramelized, mouthwatering feast an hour later. It feels effortless, comforting, and deeply satisfying.
However, if you are a beginner cook, roasting can sometimes feel like a game of Russian roulette. Why did the potatoes turn out soggy instead of crispy? Why is the chicken breast dry while the thighs are barely cooked? Why did the garlic burn to a crisp before the carrots were even tender?
If you have experienced any of these kitchen heartbreaks, take a deep breath: you are not a bad cook. You are simply falling into common beginner traps. Roasting seems simple, just toss food in the oven, right? However, it relies on subtle science, heat management, and proper technique. To help you conquer your oven and elevate your meals, here are the 14 most common roasting mistakes beginner cooks make and exactly how to fix them.
14 Common Roasting Mistakes Beginner Cooks Make
Below, we break down 14 common roasting mistakes from a real cook perspective, along with detailed solutions you can actually apply in your kitchen.
Putting Meat Straight from the Fridge into the Oven
It's very common to take meat directly out of the refrigerator and place it straight into the oven, especially when you're in a hurry. While this seems efficient, cold meat cooks unevenly because the outer layers heat up much faster than the still-cold center. This can result in a roast that is overcooked on the outside but undercooked inside, creating both texture and food safety issues.
How to Fix It
Allow your meat to sit at room temperature before roasting. This doesn't mean leaving it out for hours, but giving it about 20-40 minutes (or longer for large cuts) helps reduce the temperature difference between the outside and inside. As a result, the meat cooks more evenly, giving you a better texture and more predictable results.
Crowding the Baking Sheet
Piling a huge mountain of chopped veggies onto a single baking sheet to avoid washing a second pan is one of the quickest ways to ruin a roast. When food heats up, it releases moisture in the form of steam. If your ingredients are packed tightly together, that trapped steam gets trapped around the food, causing it to steam in its own moisture rather than roast in dry heat. Instead of achieving golden, crispy, caramelized edges, you end up with dull, soggy, and mushy vegetables.
How to Fix It
Give your food breathing room! Arrange your ingredients in a single layer with visible space between each piece. If you hear a gentle sizzle in the oven, you are doing it right. If you have too much food, split it across two baking sheets and rotate them halfway through cooking.

Cutting Ingredients into Uneven Sizes
Chopping some carrots into thick rounds while leaving others in thin ribbons on the exact same tray guarantees uneven cooking. Because smaller pieces cook much faster than larger ones, you create a timing mismatch. By the time your large potato chunks are finally tender enough to pierce with a fork, the smaller pieces alongside them will have turned into burnt, black cinders.
How to Fix It
Focus on knife consistency. Try to cut similar ingredients into uniform shapes and sizes. If you are cooking different types of vegetables together (like dense sweet potatoes and delicate zucchini), cut the denser items smaller and the softer items larger so they finish cooking at the same time. Alternatively, cook them on separate pans.
Seasoning Too Late Before Roasting
Many beginner cooks season meat right before placing it in the oven, thinking that adding salt and spices at the last minute is enough to create great flavor. While this can add some taste to the surface, the seasoning does not have enough time to penetrate deeper into the meat. As a result, the outside may taste flavorful while the inside remains bland, especially when roasting larger cuts like chicken, turkey, pork loin, or beef.
How to Fix It
For the best flavor, season your meat ahead of time whenever possible. For large cuts of meat, dry brining with salt several hours or even overnight allows the seasoning to slowly penetrate while also helping the meat retain moisture. For smaller cuts or when you're short on time, seasoning 30 minutes to 1 hour before roasting can still improve flavor. If you only have a few minutes, don't skip seasoning completely, just make sure the seasoning is evenly distributed and combined with a small amount of oil to help it stick to the surface.
Skipping the Preheating Step
Putting your food into the oven while it is still warming up in an attempt to save time strips away the magic of roasting. Roasting relies on a sudden blast of high, dry heat to sear the exterior of food, locking in moisture and building a rich, caramelized crust. Placing food in a cold oven causes it to heat up slowly, leaking moisture and dehydrating long before the exterior ever gets a chance to brown properly.
How to Fix It
Always preheat your oven completely before your food goes in. Give your oven at least 15 to 20 minutes to reach its target temperature. For an even better sear on vegetables or potatoes, place your empty baking sheet inside the oven while it preheats. Dropping veggies onto a screaming-hot pan instantly kickstarts caramelization!
Using the Wrong Oven Temperature
Beginner cooks often use a "one-temperature-fits-all" approach, setting the oven to a default temperature regardless of what they're cooking. Others may randomly adjust the temperature without understanding how it affects the cooking process. This can cause food to burn on the outside before cooking through, or cook too slowly and dry out.
How to Fix It
Different foods require different roasting temperatures. For example, vegetables benefit from higher heat to develop crisp edges, while larger cuts of meat need moderate heat to cook evenly without drying out. Learning these basic temperature guidelines—and adjusting based on your specific dish—will significantly improve your results.
Tossing Everything onto the Pan at the Same Time
Throwing dense root vegetables like beets or potatoes onto a baking sheet alongside delicate ingredients like asparagus, cherry tomatoes, or sliced garlic causes severe overcooking. Different ingredients have wildly different cooking times—potatoes require 35 to 45 minutes to roast through, whereas asparagus takes barely 12 to 15 minutes. Cooking them together leaves you choosing between raw potatoes or completely incinerated asparagus.
How to Fix It
Master the staggered cooking method:
- Start roasting dense root vegetables first.
- Pull the tray out halfway through cooking time, add quick-cooking veggies, toss gently, and return the pan to the oven.
- Alternatively, roast different ingredients on separate baking sheets so you can pull them out as they finish.
Skimping on or Overdoing Cooking Oil
Using only a tiny spray of oil out of fear of extra calories or doing the opposite and drowning your ingredients in a pool of fat, severely degrades the texture of your roast. Oil acts as a vital heat conductor in roasting, transferring heat evenly across the surface of ingredients to crisp the exterior. Without enough oil, your food will dehydrate, turn leathery, and stick to the pan; too much oil leaves you with heavy, greasy, soggy results.
How to Fix It
Aim for a light, glossy coating on every piece of food. As a general rule of thumb, use 1 to 2 tablespoons of oil per pound of vegetables or meat. Toss your ingredients in a bowl with oil before dumping them onto the baking sheet so every piece is evenly coated.
Using the Wrong Type of Oil
Reaching for extra virgin olive oil or unrefined coconut oil when roasting at high temperatures (400°F / 200°C and above) ruins both flavor and health quality. Unrefined oils have low smoke points, meaning they break down rapidly under high heat, emitting thick smoke and imparting a bitter, acrid taste to your meal. Furthermore, burning oil releases unwanted free radicals and harsh compounds into your kitchen.
How to Fix It
Match your oil to your cooking temperature:
- High-Heat Roasting (400°F-450°F / 200°C-230°C): Use high-smoke-point oils like avocado oil, canola oil, refined olive oil, vegetable oil, or grapeseed oil.
- Low-to-Medium Roasting (under 375°F / 190°C): Extra virgin olive oil and butter work wonderfully here for flavor.
Relying on Timers and Visual Cues
Relying strictly on recipe timer estimates or cutting into a roast chicken to see if the juices run clear is a recipe for disappointment. Recipe times are just rough guesses, factors like your oven's true temperature, the thickness of the meat, and starting room temperature drastically alter cooking duration. Guessing leads to either dangerous undercooking or overcooked, bone-dry meat that chews like leather. Cutting into meat while it cooks punctures the muscle fibers, spilling out all the internal juices onto the pan.
How to Fix It:
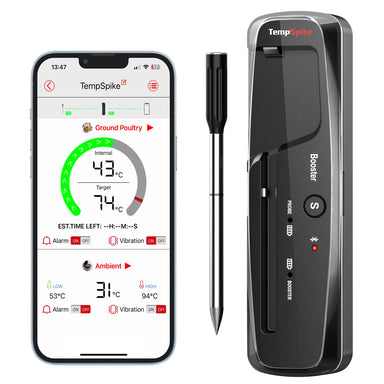
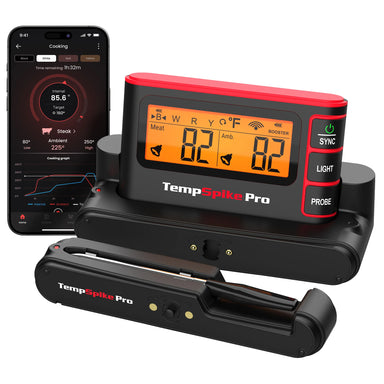
The single greatest upgrade a beginner cook can make is investing in a reliable digital meat thermometer. You cannot manage what you do not measure! For effortless, stress-free roasting, we highly recommend the TempPro TempSpike Plus TP971 Smart Wireless Meat Thermometer.
Why the TempSpike Plus TP971 is an absolute game-changer for beginners:
- Truly Wire-Free Probe: Say goodbye to tangled, burnt cords sticking out of your oven door. The sleek, 100% wire-free probe slide directly into your meat, making it incredibly easy to use on roasts, whole chickens, or two different cuts of meat at once.
- 600-Ft Ultra-Long Bluetooth Range: Thanks to the powerful standalone booster base, you can leave your roast in the kitchen and walk to the living room, yard, or basement without losing connection.
- Dual Sensors per Probe: Each probe measures both the internal meat temperature (up to 212°F / 100°C) and the ambient oven temperature (up to 572°F / 300°C) simultaneously. This means you'll know if your oven is running too hot or cold in real time.
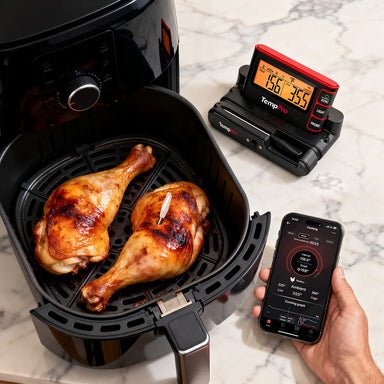
- Smart App & Standalone Booster Display: The companion app guides you through target temperatures for various meats and sends custom alerts when your meal is ready. Plus, the booster base features a bright backlit screen, so you don't even need your phone on hand to check status.

By taking the guesswork out of cooking, a tool like the TempSpike Plus TP971 guarantees perfectly juicy pork loins, tender turkey, and succulent roast beef every single time.
Forgetting to Turn or Flip Food Halfway
Placing a tray in the oven, shutting the door, and walking away until the timer goes off leaves your roast vulnerable to heat imbalances. Most residential ovens have hot spots (typically near the back corners), and the side of the food touching the hot metal pan cooks much faster than the side exposed to air. Leaving food undisturbed results in lopsided browning and unevenly cooked textures.
How to Fix It
Set a midpoint timer! Halfway through your roasting time:
- Flip your food using a spatula or tongs so both sides get equal contact with the hot sheet pan.
- Rotate the baking sheet 180 degrees to counteract any uneven heat distribution inside your oven.
Opening the Oven Too Frequently
When you're unsure about your cooking, you might find yourself repeatedly opening the oven door to check on your food. While this feels reassuring, it actually disrupts the cooking process.
How to Fix It:
Every time you open the oven door, heat escapes and the temperature drops significantly. This can increase cooking time and lead to uneven results. Instead, minimize how often you check your food and rely on tools like TempSpike Plus TP971 wireless meat thermometer to monitor progress without opening the oven.

Using High-Sided Baking Dishes for Roasting Vegetables
Attempting to roast broccoli, carrots, or potatoes inside a deep glass casserole dish or high-sided baking pan suffocates the ingredients. High container walls trap the steam released by vegetables as they bake, creating a humid microclimate inside the dish. Because hot air cannot circulate freely around the base of the food, the moisture never evaporates, preventing crispy edges from forming.
How to Fix It
Swap your casserole dish for a low-rimmed sheet pan (half-sheet pan) or a flat heavy-duty baking tray. The low borders allow hot oven air to circulate freely around every piece of food, evaporating moisture instantly and delivering maximum crispiness.
Slicing Meat Immediately After Pulling It Out of the Oven
Carving into a hot roast chicken or steak the second it lands on the kitchen counter squeezes out all the moisture you worked so hard to build. As meat roasts, its muscle fibers contract and push internal juices toward the center of the cut. Slicing into it right away releases those delicious juices all over your cutting board, leaving the actual meat dry, tough, and chewy.
How to Fix It
Let it rest! Tent your meat loosely with aluminum foil and allow it to rest before carving:
- Small cuts (chicken breasts, steaks, pork chops): Rest for 5 to 10 minutes.
- Large roasts (whole chickens, pork shoulder, prime rib): Rest for 15 to 20 minutes.
During resting, internal muscle fibers relax, reabsorbing the juices evenly throughout the meat. Bonus tip: Meat continues to cook from residual heat after leaving the oven (carryover cooking), which is why real-time monitoring with your TempPro TP971 helps you pull meat out 5°F before your final target temp!
Final Thoughts
Roasting does not require a culinary degree, just a little patience, attention to detail, and the right tools. By giving your food space to breathe, choosing high-smoke-point oils, respecting rest times, and using a smart wireless meat thermometer like the TempPro TempSpike Plus TP971, you will eliminate kitchen anxiety and cook with confidence.
Next time you plan dinner, pick your favorite seasonal veggies, a quality piece of protein, fire up your oven, and enjoy the delicious rewards of perfect roasting!


Comments

Recommended Products