Comment préparer une porchetta digne d'un restaurant à la maison


 288 Comments


Bien que la Porchetta puisse sembler être un plat compliqué, il s'agit au fond de poitrine de porc assaisonnée, roulée, ficelée et rôtie lentement jusqu'à ce que la viande soit riche et tendre, et que la peau se brise comme du verre. L'assaisonnement est simple, généralement sel, poivre, ail, romarin et fenouil, et la liste des ingrédients dépasse à peine une poignée d'éléments.

Dans le passé, la version originale de la Porchetta était un porc entier désossé, frotté aux herbes et tourné à la broche sur le feu. C'est encore ainsi que vous la verrez dans les festivals italiens et sur les stands en bord de route. Pourquoi ai-je déjà mentionné la poitrine de porc ? La raison est que la poitrine seule est le choix le plus indulgent si vous la préparez pour la première fois. De même, la plupart des restaurants servent en réalité une poitrine de porc avec la peau enroulée autour d'un morceau de filet de porc, ou souvent simplement la poitrine seule, roulée serrée et ficelée. Par conséquent, choisissez la poitrine de porc comme premier choix si vous souhaitez essayer ce plat.
Le problème des deux températures
Vous pourriez vous sentir confiant après avoir appris que les ingrédients de la porchetta sont simples et que la préparation est directe. Cependant, il y a une chose à laquelle vous devez prêter plus d'attention : la température. C'est que vous cuisinez deux coupes de porc très différentes dans la même rôtissoire, et elles nécessitent des conditions complètement différentes.
La poitrine de porc et la couenne sont chargées de gras et de collagène, et le collagène ne se décompose pas avant que la viande n'atteigne environ 77°C (170°F). Une fois cette température atteinte, le gras fond, la viande devient soyeuse et la couenne est prête à croustiller. Le filet de porc est l'opposé : il est maigre, ne contient presque pas de tissu conjonctif et est cuit à 63°C (145°F). Au moment où la poitrine autour est à point, le filet à l'intérieur est déjà bien cuit depuis un certain temps et commence à sécher. Ajoutez à cela le fait qu'une couenne croustillante nécessite un coup de chaleur élevé à la fin, et vous avez trois exigences qui s'opposent à l'intérieur d'un seul rôti.
C'est précisément pourquoi la porchetta tourne mal à la maison, et pourquoi tant de gens se retrouvent avec une peau molle et difficile à mâcher ou une viande sèche au milieu. Vous ne pouvez pas faire la différence en devinant.
Pourquoi les restaurants ont un avantage
Les cuisines des restaurants résolvent ce problème avec l'équipement et l'attention. Une rôtissoire commerciale fait tourner le rôti en continu sur une chaleur uniforme et contrôlée, de sorte qu'il dore uniformément au lieu de brûler sur le côté qui fait face à la flamme. Tout aussi important, un chef est là tout le temps, observant le développement de la couleur, ajustant la chaleur et déplaçant la position du rôti lorsqu'une section prend de l'avance sur une autre.

L'écart d'équipement est plus petit qu'il n'y paraît. Un accessoire de rôtissoire sur un gril à charbon de bois vous offre le même tour continu sur feu vif, ce qui est exactement la façon dont notre recette de porchetta avec sauce chimichurri le cuit, faisant tourner le ventre roulé sur des charbons ardents avant que la chaleur ne soit augmentée pour le crépitement. Si vous demandez "Je n'ai pas l'accessoire de rôtissoire dans ma cuisine, que puis-je faire ?", la réponse est très directe : un four standard fait une excellente porchetta, et la section ci-dessous explique comment compenser si vous n'avez pas un tel équipement.
Ce qu'aucun équipement ne remplace, c'est le chef qui, ayant de nombreuses années d'expérience dans la préparation de ce plat, reste là pendant quatre heures. Une fois la porte ou le couvercle fermé, vous cuisinez à l'aveugle, et un coup d'œil à la surface vous en dit très peu sur la température au centre. C'est cet manque d'information, et non un manque d'équipement ou de compétence, qui sépare la plupart des porchettas faites maison de la version que vous achèteriez en Italie. Ensuite, je vais d'abord exposer les préparations nécessaires pour assurer un processus de rôtissage réussi, suivies de solutions pour gérer les températures de rôtissage.
Sécher la peau en premier
L'eau est l'ennemie du craquant, la couenne doit donc être déshydratée avant même de rencontrer une forte chaleur. Cela signifie piquer la couenne partout et la saler abondamment, puis laisser le porc à découvert au réfrigérateur pendant 24 à 48 heures. Le sel attire l'humidité à travers ces trous tandis que l'air froid et sec du réfrigérateur élimine le reste. Plus c'est long, mieux c'est ici. Au moment de la cuisson, la surface doit être sèche et tendue plutôt qu'humide, et c'est ce qui lui permet de gonfler et de cloquer plus tard au lieu de devenir caoutchouteuse.
Cuisinez en deux étapes
La cuisson elle-même fonctionne mieux en deux étapes distinctes plutôt qu'en une seule, car la viande et la couenne nécessitent des conditions opposées. C'est l'une des conditions nécessaires pour obtenir une porchetta parfaite.
Une fois la poitrine salée à sec, ouvrez-la en papillon, étalez votre assaisonnement sur le côté viande, puis roulez-la fermement, la peau vers l'extérieur, et attachez-la avec de la ficelle de boucher. Insérez une sonde dans la partie la plus épaisse du rouleau, réglez votre four à une douce température de 150°C (300°F), et laissez cuire. Cette première étape est volontairement lente, donnant au gras le temps de fondre et au collagène le temps de se dissoudre sans priver la viande de son humidité. Selon la taille, cela peut prendre de quatre-vingt-dix minutes à plusieurs heures, c'est précisément pourquoi une cuisson basée sur le temps plutôt que sur la température est si peu fiable ici.
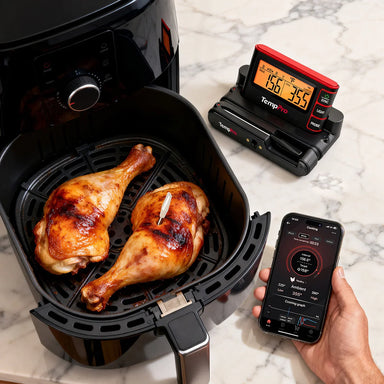
Comme je l'ai mentionné précédemment, si vous n'avez qu'un four standard dans votre cuisine. Quelques petites choses peuvent vous aider à résoudre ce problème. Placez la porchetta sur une grille au-dessus d'une plaque de cuisson plutôt que directement sur la plaque, afin que l'air puisse atteindre le dessous au lieu de piéger la vapeur. Tournez la plaque toutes les quarante-cinq minutes environ pour uniformiser les points chauds de votre four, ce qui revient à faire à la main ce qu'une broche fait en continu. Si votre four a une fonction convection ou ventilateur, utilisez-la, car l'air en mouvement dore et croustille beaucoup plus uniformément que l'air stagnant. Pour un rôti plus petit, une friteuse à air fonctionne sur le même principe et rend la peau magnifiquement croustillante.
Lorsque la température interne atteint environ 71 à 77°C (160 à 170°F), la viande a fait ce qu'elle devait faire. La deuxième étape commence : augmentez fortement la température du four, entre 220 et 230°C (425 et 450°F), et laissez cuire environ vingt minutes. Ce coup de chaleur intense est ce qui dessèche la surface et fait gonfler la peau pour obtenir un véritable craquant. C'est aussi la partie la plus risquée de toute la cuisson, car la même chaleur qui rend la peau croustillante fera rapidement surchauffer l'intérieur si vous ne surveillez pas. La même logique s'applique sur un gril, où l'on fait d'abord tourner le rôti sur des charbons modérés, puis on augmente le feu à plus de 450°F pour terminer.
Comment savoir ce qui se passe à l'intérieur
Tout ce qui précède dépend d'une chose : connaître la température à l'intérieur du rôti sans ouvrir le four, et la connaître en continu plutôt que par des instantanés occasionnels.
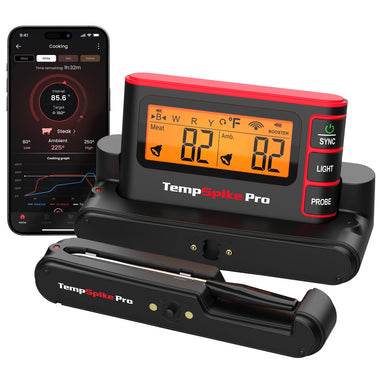
Un thermomètre sans fil à laisser dedans comme le TempPro TempSpike Plus TP972 Meat Thermometer est conçu précisément pour ce genre de rôtissage long et échelonné. Il reste dans la viande de la première à la dernière heure, suivant la température interne en continu afin que vous puissiez voir le rôti monter vers 170°F au lieu de deviner. Comme il lit également la température ambiante, vous pouvez également voir ce que votre four ou votre gril fait réellement plutôt que de faire confiance au cadran, ce qui est important lorsque vous augmentez la chaleur pour la dernière étape. Une longue portée Bluetooth stable signifie que vous pouvez quitter complètement la cuisine et toujours recevoir une alerte au moment où votre objectif est atteint, et l'amplificateur LCD vous donne une lecture en un coup d'œil sans avoir à chercher votre téléphone.

Cette vue continue est ce qui transforme la porchetta d'un pari en un processus. Vous savez quand le collagène est rendu, vous connaissez le moment exact pour augmenter la chaleur, et vous savez quand la retirer avant que l'étape de la peau n'entraîne l'intérieur trop loin. C'est ce qui résout le problème à la source avec notre produit.
Reposer avant de trancher
Lorsque la couenne est croustillante et que le rôti sort, résistez à l'envie de le couper tout de suite. Laissez-le reposer dix à quinze minutes sur la planche. Les jus ont besoin de ce temps pour se redistribuer dans la viande, et le trancher trop tôt les enverrait sur votre planche à découper au lieu de rester dans le porc.
Utilisez un couteau à pain lorsque vous tranchez, car une lame droite a tendance à écraser le craquant plutôt que de le couper. Bien fait, chaque tranche devrait tenir ensemble avec une ligne nette de couenne croustillante le long de l'extérieur.
Le contrôle, c'est toute la recette
La Porchetta a la réputation d'être un projet, mais la liste des ingrédients est courte et la technique n'a rien d'exotique. Ce qu'elle exige, c'est du contrôle : sécher correctement la couenne, faire passer la poitrine au-delà du point où la graisse fond sans dessécher la viande, puis appliquer un coup de chaleur intense au moment précis pour le croustillant.
Rien de tout cela n'est possible lorsque vous cuisinez à l'aveugle. C'est pourquoi je vous recommande vivement notre produit. Une fois que vous pouvez voir les températures internes et ambiantes avec TempPro TP972 tout au long du processus, les décisions ne sont plus des suppositions, mais deviennent évidentes. Si vous préférez suivre l'ensemble du processus du début à la fin, notre recette complète de porchetta avec sauce chimichurri vous guide à travers le salage à sec, le roulage et la cuisson à la rôtissoire, avec une sauce aux herbes vives qui tranche directement la richesse du porc.

FAQ
Q1 : Pourquoi la peau de ma porchetta n'est-elle pas croustillante ?
Généralement parce que la peau était encore humide en entrant au four. Faites-la sécher à découvert au réfrigérateur pendant 24 à 48 heures, puis terminez par un coup de chaleur intense.
Q2 : Quelle température interne la porchetta doit-elle atteindre ?
Environ 71 à 77°C (160 à 170°F). Le porc est sûr à 63°C (145°F), mais la poitrine et la peau ont besoin de la chaleur supplémentaire pour rendre la graisse et décomposer le collagène.
Q3 : Puis-je cuire la porchetta à une seule température tout le temps ?
Oui, mais les résultats sont beaucoup moins constants. Une approche en deux étapes permet de cuire la viande doucement et de faire croustiller la peau séparément.
Q4 : Pourquoi la porchetta sèche-t-elle ?
Généralement parce que l'intérieur a trop cuit pendant que vous essayiez de faire croustiller la peau. C'est particulièrement courant avec les versions qui incluent du filet de porc maigre.
Q5 : Dois-je utiliser de la poitrine de porc seule ou de la poitrine enroulée autour du filet ?
La poitrine seule est plus indulgente, car le filet maigre sèche bien avant que la poitrine et la peau ne soient prêtes.
Q6 : Puis-je faire la porchetta sur le gril au lieu du four ?
Oui. Un accessoire de rôtisserie sur charbon de bois fonctionne à merveille, et c'est ainsi que notre recette de porchetta avec sauce chimichurri est cuite.
Q7 : Ai-je besoin d'une rôtissoire pour faire la porchetta ?
Non. Un four ordinaire fonctionne bien. Utilisez une grille pour la circulation de l'air, tournez la plaque toutes les 45 minutes et activez la fonction convection si vous en avez une.
Q8 : Qu'est-ce qui rend le TempSpike Plus utile pour la porchetta ?
Il surveille en continu la température interne et ambiante, ce qui vous permet de suivre une longue cuisson et de chronométrer l'étape à haute température sans ouvrir le four. Si vous avez besoin de plus d'options, vous pouvez visiter les thermomètres à viande intelligents.
Q9 : Puis-je me fier au temps de cuisson plutôt qu'à la température ?
Non. La taille, la forme et la température de départ varient trop pour que le temps seul soit fiable.
Q10 : Combien de temps la porchetta doit-elle reposer avant d'être servie ?
Environ 10 à 15 minutes, suffisamment longtemps pour que les jus se redistribuent dans la viande.


Commentaires
Vous aimerez peut-être aussi


Produits recommandés